A Handmade gift is an interesting object to showcase your creativity.
It excellently communicates your feelings and emotions to your loved ones.
Your friends and family will certainly be overwhelmed to receive your handmade gifts, both for their aesthetic value and the efforts that you have put in.
If you are a person who likes to give a personal touch to everything you present to someone, this article is for you.
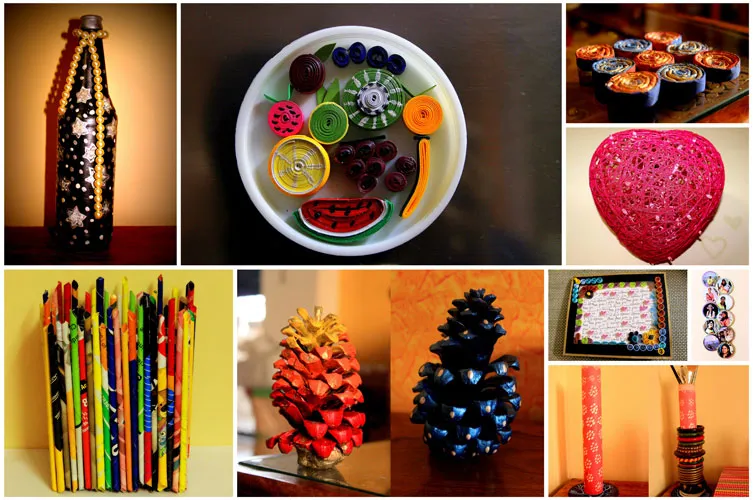
In this post, I have written about nine handmade gift items that I have created as a result of my subjective innovation and online inspiration.
What is specific about all of these objects is the fact that the primary material that is used here is household waste.
This process of recycling also makes these environment-friendly gift options.
Therefore, if you have a little bit of interest in art and craft, making a handmade gift is undoubtedly a beneficial endeavor.
Benefits of Creating Handmade Gifts
- Aesthetic Value– Handmade gifts are appreciated a lot because of the beauty and aesthetic value that they add to the environment.
- Personalized Gifts– These are very good gifts, wrapped up with personal wishes and blessings that are evident in the form of efforts made by the presenter.
- Environment Friendly– Since household waste is the primary material, therefore, these are very environment-friendly; recycling what is existing and not creating any further waste.
- Cost-Effective– The use of already existing free material also makes these cost-effective.
- Utilization of Skills and Time– The process of creating handmade gifts proposes itself to be an effective means to utilize your skills and time.
- Creative Expression– The process of creation gives one an opportunity to express him/herself creatively. This, as a result, helps in establishing the self and social identity of the creator.
- Stress Reducer- By engaging oneself in a creative process, handmade craft proves to be a stress reducer.
Few Easy Handmade Gift Ideas
#1 Pen Stand

Things Needed –
- An Empty Cardboard Box (e.g. a Tea Box)
- Colorful Pamphlets/Magazine Papers
- A Ball Pen Refill
- Glue
- Scissors
Time Duration –
2 hours Approx
Follow these Simple Steps to Make a Handmade Pen Stand
- First of all, cut the empty cardboard box into a size a little smaller than what you want your pen stand to be.
- Now, cut the colorful pamphlets or magazine papers into small sheets of about 4”x10”.
- Further, roll these small paper sheets diagonally with the help of a ball pen refill; fix ends with the glue. You will have something like a paper pipe. We need to paste these on our cardboard box, the way it is shown in the image. Therefore, have those paper pipes in plenty of numbers to be able to cover the whole box from the outside.
- Now, paste a magazine paper inside the box and start sticking the rolled paper pipes vertically on the outer side of the box.
- Similarly, you can decorate the base of the box, if you wish to; otherwise, leave it as it is. Your pen stand is ready.
This handmade gift will certainly be liked by people who do desk work, either at home or in the office.
It’s one of the perfect handmade gift ideas for someone who loves to read and write.
#2 Yarn Heart

Things Needed –
- Heart Shape Balloon
- Air Balloon Pump
- Old Yarn (any color of your choice)
- Glue (Fevicol preferably)
- Water
- Pearl Fabric Color
- Brush
- Rice Lights (optional)
Time Duration –
1 hour Approx (excluding drying time)
The following Steps will Guide you to make a Perfect Handmade Yarn Heart
- First of all, mix an equal quantity of fevicol and water in a spacious plastic container; it can either be a big kitchen bowl or a small bathroom tub. Remember the mixture should not be very thin because it is going to affect the texture and toughness of your ‘yarn heart’.
- Now, take your heart-shaped balloon and blow it with the help of your air pump; secure air by tying a knot or with the help of a thread.
- Then, take a yarn ball (40 gm) of your favorite color and dip it properly into the fevicol mixture.
- After this, start wrapping the balloon with the wet yarn; try to cover it from all the sides leaving space in between. Secure the end and keep the balloon aside for getting dry. Drying may take three to ten hours, depending on the weather. Do not worry if it looks whitish, it will get its color back after being dry.
- After the yarn gets dry, pin the balloon. It will start separating itself from the yarn due to the air puncture. Now, get the punctured balloon out with the help of your fingers or any small object e.g., a pen. Your yarn heart is ready.
- You can now paint it with colors similar to the yarn so that it has a uniformly even tone; try simple fabric or pearl colors. Finally, when the color is dried up, tie a string to hang it in a place of your choice.
You can use balloons of various shapes and sizes and also add rice lights to them.
It can be a very good handmade gift for Diwali, Christmas, or New Year.
#3 Painted bottles

Things Needed –
- An Empty Bottle
- Fabric Colours
- Brush
- Pearl Beads
- Thread
Time Duration –
1 Hour 30 minutes Approx (depending on your design)
Please Find Below Easy Steps to Prepare Painted Bottles at Home
- Take your plastic or glass bottle and remove all the paper tags from it. Soak the bottle in warm soapy water if the sticky paper does not come out easily.
- After you have cleaned the bottle, paint it with the white fabric color.
- Once, the color has dried up, paint it again with any color of your choice. Decide your color and design in advance.
- Check if you need to do another layer of color after the second layer is dry. Be creative and make your own designs on the bottle. You can experiment with pearl, glittery, metallic, and glow colors.
- Finally, make a string of pearl beads and tie it to the neck of the bottle. Your painted bottle is ready.
This handmade gift can be used as a decorative item, as it is, or can be used as a flower vase.
I made it with a mixture of fabric and glow colors and gifted it to a friend, who now uses it as a nightlight.
#4 Photo/Message Frame

Things Needed –
- Cardboard
- Cutter
- Colorful Paper
- Transparent Projector Sheet
- Glue
- Photo/Message
- Quilling Strips
- Quilling Slotted tool (needle)
Time Duration –
3 hours Approx (depending on your design)
The following Steps will Guide You on How to Make a Handmade Photo Frame
- First of all, decide upon the size of your photo/message frame; this will also depend on the size of your photo or message card.
- Further, cut the cardboard in that size; turn it into a frame of about 2’’ by cutting the center section out of it.
- Then, paste a colorful paper on it covering both sides.
- Now, take a transparent projector sheet and past on one of the sides; cut any excess sheet from the edges.
- After this, paste the picture or message card to the inner side of it, in a way similar to how you put a picture in a frame- facing the outer side.
- Now, cover the inner side with cardboard well decorated with any colorful paper.
- Finally, either attach a string to the upper side or a paper stand to the lower side of it.
- It’s time to decorate your photo frame with quilling strips. Use your innovation and decorate it with different shapes, sizes, and designs made by quilling strips.
While this might seem like a time-consuming activity, your loved ones are going to adore this precious handmade gift.
#5 Painted Pine Flowers

Things Needed –
- Pine Flowers
- fabric Colours
- Brush
- White cement
- Water
Time Duration –
45 minutes Approx
Find Below Quick Steps to Make Painted Pine Flowers
- To decorate these flowers, you have to, first of all, wash and dry them; remove all the dust, leaves, and natural glue that might be sticking in. While the flowers are drying, decide upon your favorite fabric colors.
- Now, paint the flowers; you can use two-three colors in combination. When the color has dried, make a paste of white cement by mixing water into it and put some of this mixture at the base of the flowers in a way that these are able to stand straight (this step may not be needed if your pine flower is able to stand straight on its own).
Wow! Your painted pine flower is ready.
You can gift these in a pair or a set of three/four. Perhaps, this is the easiest handmade gift with fewer efforts.
However, these painted Pine flowers can add life to anyone’s living room, especially those who like to decorate it in a crafty way.
#6 Coasters

Things Needed –
- Newspaper
- Ball Pen/Pencil
- Glue
- Fabric Colours
- Brush
Time Duration –
1 hour Approx
Coasters are among the multi-functional handmade gift ideas; one can use these on the dining/side table or as a base of small artifacts at home.
You can make different varieties of coasters using newspapers, old compact discs, yarn, or clothing.
The one that you are going to learn here is made of newspaper.
Make Coasters by Following these Simple Steps
- First of all, make long strips of the newspaper by dividing its one page into six horizontal sections.
- Turn these into paper pipes by folding diagonally with the help of a pencil; seize the ends with glue.
- After you have nine of these paper pipes, start turning them into coils. You should have nine coils (or sixteen to form a square shape) – join them together with the help of glue.
- After it is dry, pick up your favorite colors and start painting. Once, the color also dries, prepare a mix of fevicol and water (like you did for the yarn heart) and put a final protective layer on your coaster, with the help of a brush. You can use varnish instead of this fevicol mix; it is to save the coaster from liquid things that may fall upon it, while in use. Finally, your coaster is ready!
You can experiment with different colors or make a single color set (of four or six).
The person, you will gift these to, is going to love it, I ensure.
#7 Photo Collage

Things Needed –
- Assorted Photographs (4’’x 6’’)
- Compact Discs
- Glue
- Feviquick
- Fancy Thread
- Scissors
Time Duration –
One hour Approx
Steps to Make a Perfect Handmade Photo Collage
- First of all, clean the CDs and remove any dust that may be covering these.
- Cut the photographs into circles in a size that is 1.5 inches smaller (in diameter) than the size of a CD.
- Paste these pictures on the shining side of CDs with the help of glue.
- Now join the CDs by applying feviquick to the backside. You can arrange and stick these in any structure of your choice.
- After joining the CDs stick a string to the top of it; let it dry. Your photo collage is ready.
You can also use colorful shiny studs or stickers on the edges of the CDs to make them more attractive.
Since it is a personalized handmade gift, the receiver will celebrate it.
#8 Bangles & Make-up Brush Holder

Things Needed –
- One Compact Disc
- Fabric Colours
- Brush
- Empty Foil Paper Roll
- Newspaper
- Feviquick
Time Duration –
45 Minutes Approx
Follow these steps to Make a Handmade Bangle cum Make-up Brush Holder
- To make this ‘Bangles cum make-up brush holder’, you have to paint and design both the foil paper cardboard roll and the CD separately.
- Make designs on both of these with the colors of your choice.
- After the colors have dried, stick the two together with a few quick. You can also give the roll a border with the help of fancy paper tapes.
- Fill some newspaper inside the roll to the extent that you can use the open side of it to keep your brushes (2/3rd). Your simple yet innovative handmade gift is ready.
This one was one of the easiest, nice, and innovative handmade gifts ideas that I could come.
#9 Fridge Magnet

Things Needed –
- Quilling Strips
- Quilling Slotted Tool
- Fabric Colours
- Brush
- Glue
- A Small Plastic/Metal Plate
- Feviquick
- Magnet
Time Duration –
One Hour Approx
I liked this idea of sticking fruit miniatures outside the fridge, therefore, I decided for making a fridge magnet of such sort.
You can be innovative and come up with a set of different fruits, vegetables, or other food items of your choice.
Please Follow these Steps to Make an Interesting Handmade Fridge Magnet
- To make this fridge magnet, you first need to make food miniatures with the help of quilling strips and tools. Use suitable colors so that these miniatures can be identified with real food items. You may need to paint these for showing sections and seeds. Please refer to the above image to make Kiwi, Orange, Banana, Grapes, Watermelon, Dragon fruit, Plum, and Guava. Use your aesthetic sense and creativity to make different and interesting food miniatures.
- After you have your set ready, stick these to a small plastic or metal cover plate of an empty container.
- Stick a magnet at the back of it. Your fridge magnet is ready.
Wrapping It Up
These are few easy handmade gift ideas that I decided to write about in this post.
You can improvise all of these handmade gift items according to your choice of color and sense of aesthetics.
I use fabric colors, as opposed to water, because fabric colors stick to any material, look bright, and are water-resistant to some extent.
Please let me know if you have any queries regarding the procedure or materials used to create these.
It would be great if my readers also share pictures or procedures of handmade gifts that they made for their loved ones.
Let’s keep sharing and learning. Please leave your comments below. Also, if you are interested in gardening, here you can read some great tips for budding gardeners.

Loved this one!! A detailed write up!!
Thank you 🙂 Stay tuned for more such posts
Very beautiful and creative. Loved ur ideas on handmade gifts esp photo collage. ????
Thanks a lot! Keep reading and share your experiences with handmade craftwork 🙂
Wow…. Jyoti.. another very beautifully written blog….?
I am amazed… to see such simple, small and unused things which have been converted into very creatively made gifts.
One of these gifts named painted pine flower I am using in my home… which I have placed in a space which gives it a very creative look for that place…
..Very well written Blog
..Simple ideas
..Small n unused items
..But creative designs
..and finally beautiful gift…. wow…………?
Thank you for reading and appreciating!!! I hope to see more creativity in and around your home 🙂 🙂
These little pieces of creativity are what gives us intense pleasure. Jyoti you make them with such emotion that it touches us right where we can make ourselves feel loved. Thank you for sharing it with the world…
Thanks 🙂 Much Love!!!!
Good article and these are few wonderful crafts which I have witnessed Myself. Good going ?
Thanks 🙂 Much Love!!!!